Make a Headband Holder
Welcome to another tutorial in the Little Girl’s Bedroom Makeover series!
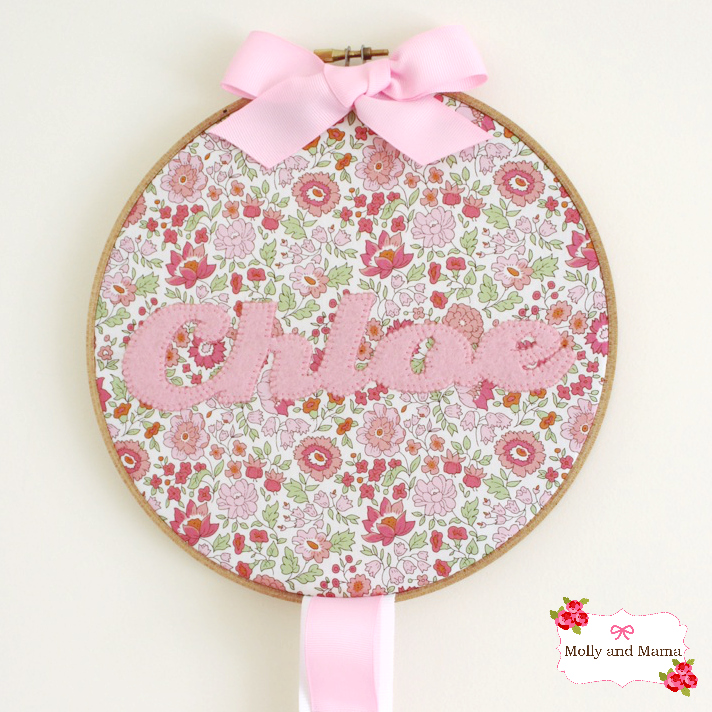
My daughter has a really large hair clip holder on her wall that’s loaded with all the pretty clips I have bought and made her. But until now we’ve had nowhere to store her lovely head bands! So I decided to create this simple tutorial using an embroidery hoop, some ribbon, fabric and felt. And I really love that it’s personalised. Read on to discover how to create a simple headband holder.
You Will Need
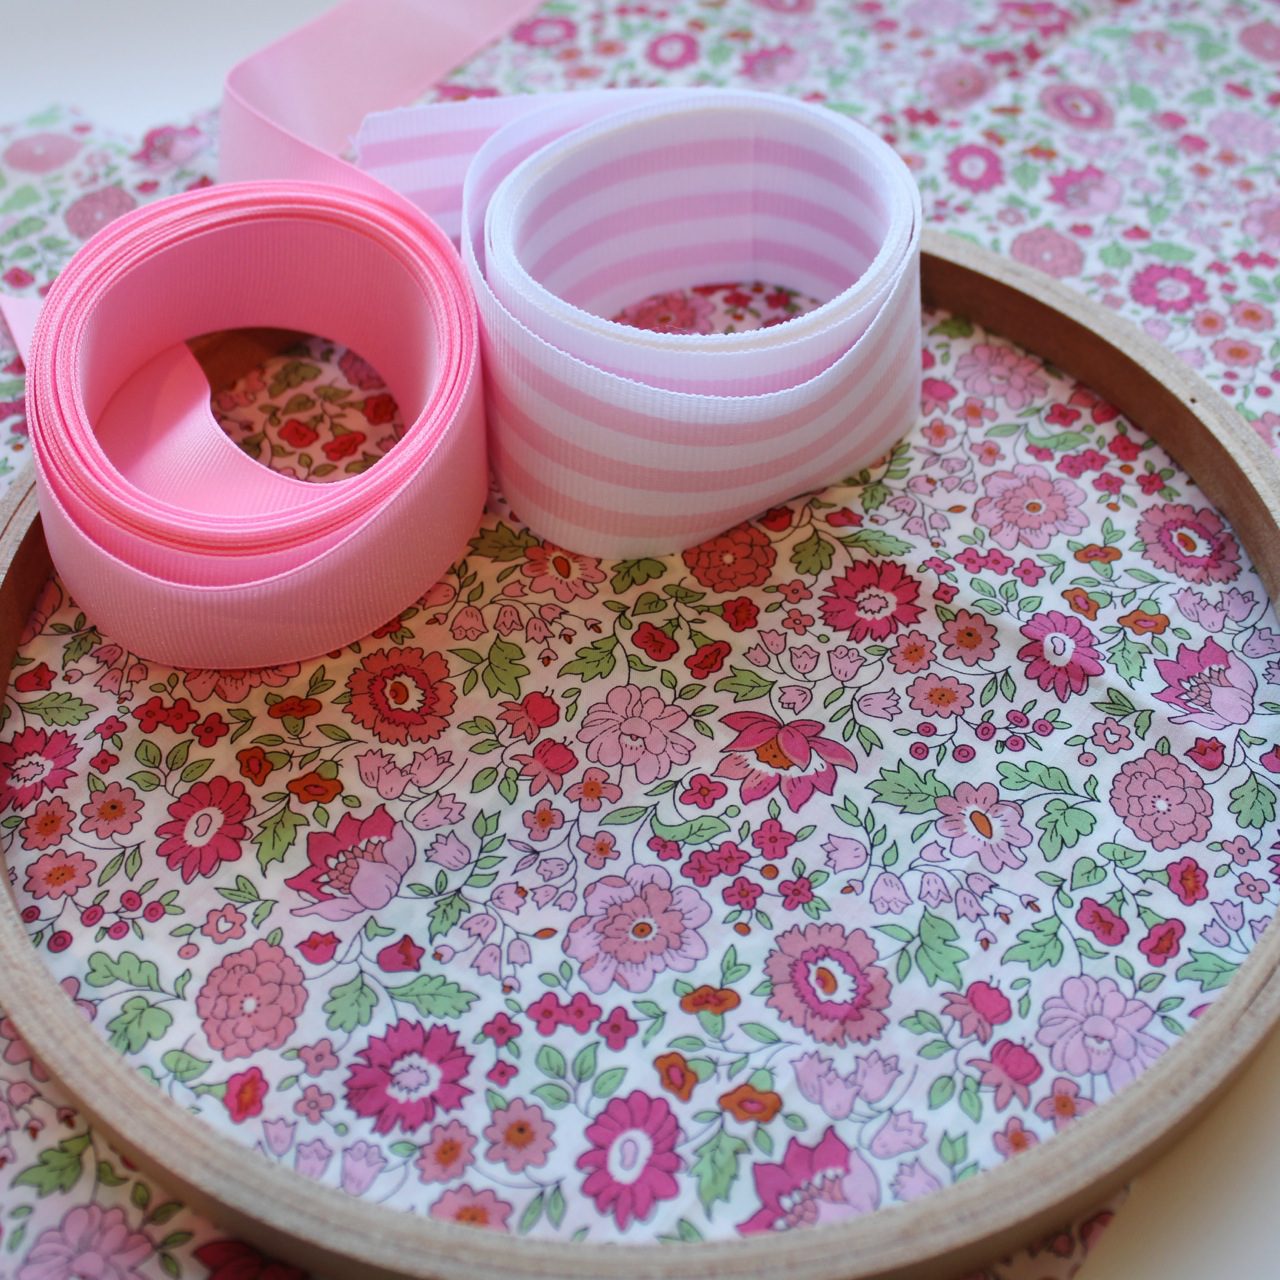
- 8” timber embroidery hoop
- 10” square of pretty floral fabric
- 10” square of fusible batting like Pellon
- 8” wide piece of wool felt
- 8” wide piece of fusible webbing like Vliesofix or Easyfix
- 30” of 1.5” wide grosgrain ribbon
- 36” of 1” wide grosgrain ribbon
- more ribbon for a decorative bow
- water erasable pen
- hot glue gun
- sewing machine and threads to coordinate with your fabric, felt and ribbon
- scissors
- iron and ironing board
- press cloth or piece of soft cotton or lawn
- computer and printer
- ruler or measuring tape
- heat sealer, lighter or matches
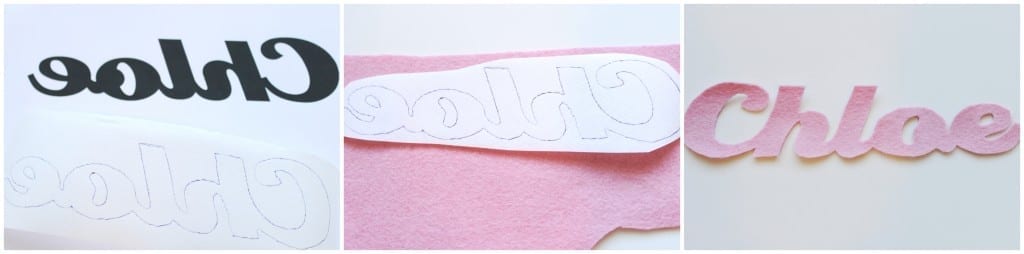
Using a program like WORD on your computer, type out the name you wish to use for your project. Use a wide cursive font so that it’s easy to appliqué. I used the font ‘creampuff’. Make sure it’s about 7” long when printed so that it will fit nicely inside the embroidery hoop. When you go to print it, choose a printer setting that lets you print in reverse. My Canon printer says ‘flip horizontally’. That way your appliqué won’t be backwards!
Take your piece of fusible webbing and trace the name (with the paper side up). Roughly around the text, leaving a small border. Do not cut out on your drawn line.
Lay your fusible webbing over your piece of wool felt. Heat your iron to a hot non-steam setting. Cover your webbing and felt with a press cloth. Fuse the paper to the felt by running the hot iron over it for a few seconds. Don’t attempt this step without the press cloth or the heat from the iron will damage the felt.
Take some small sharp scissors and carefully cut out the felt name. Pop it aside for a moment.
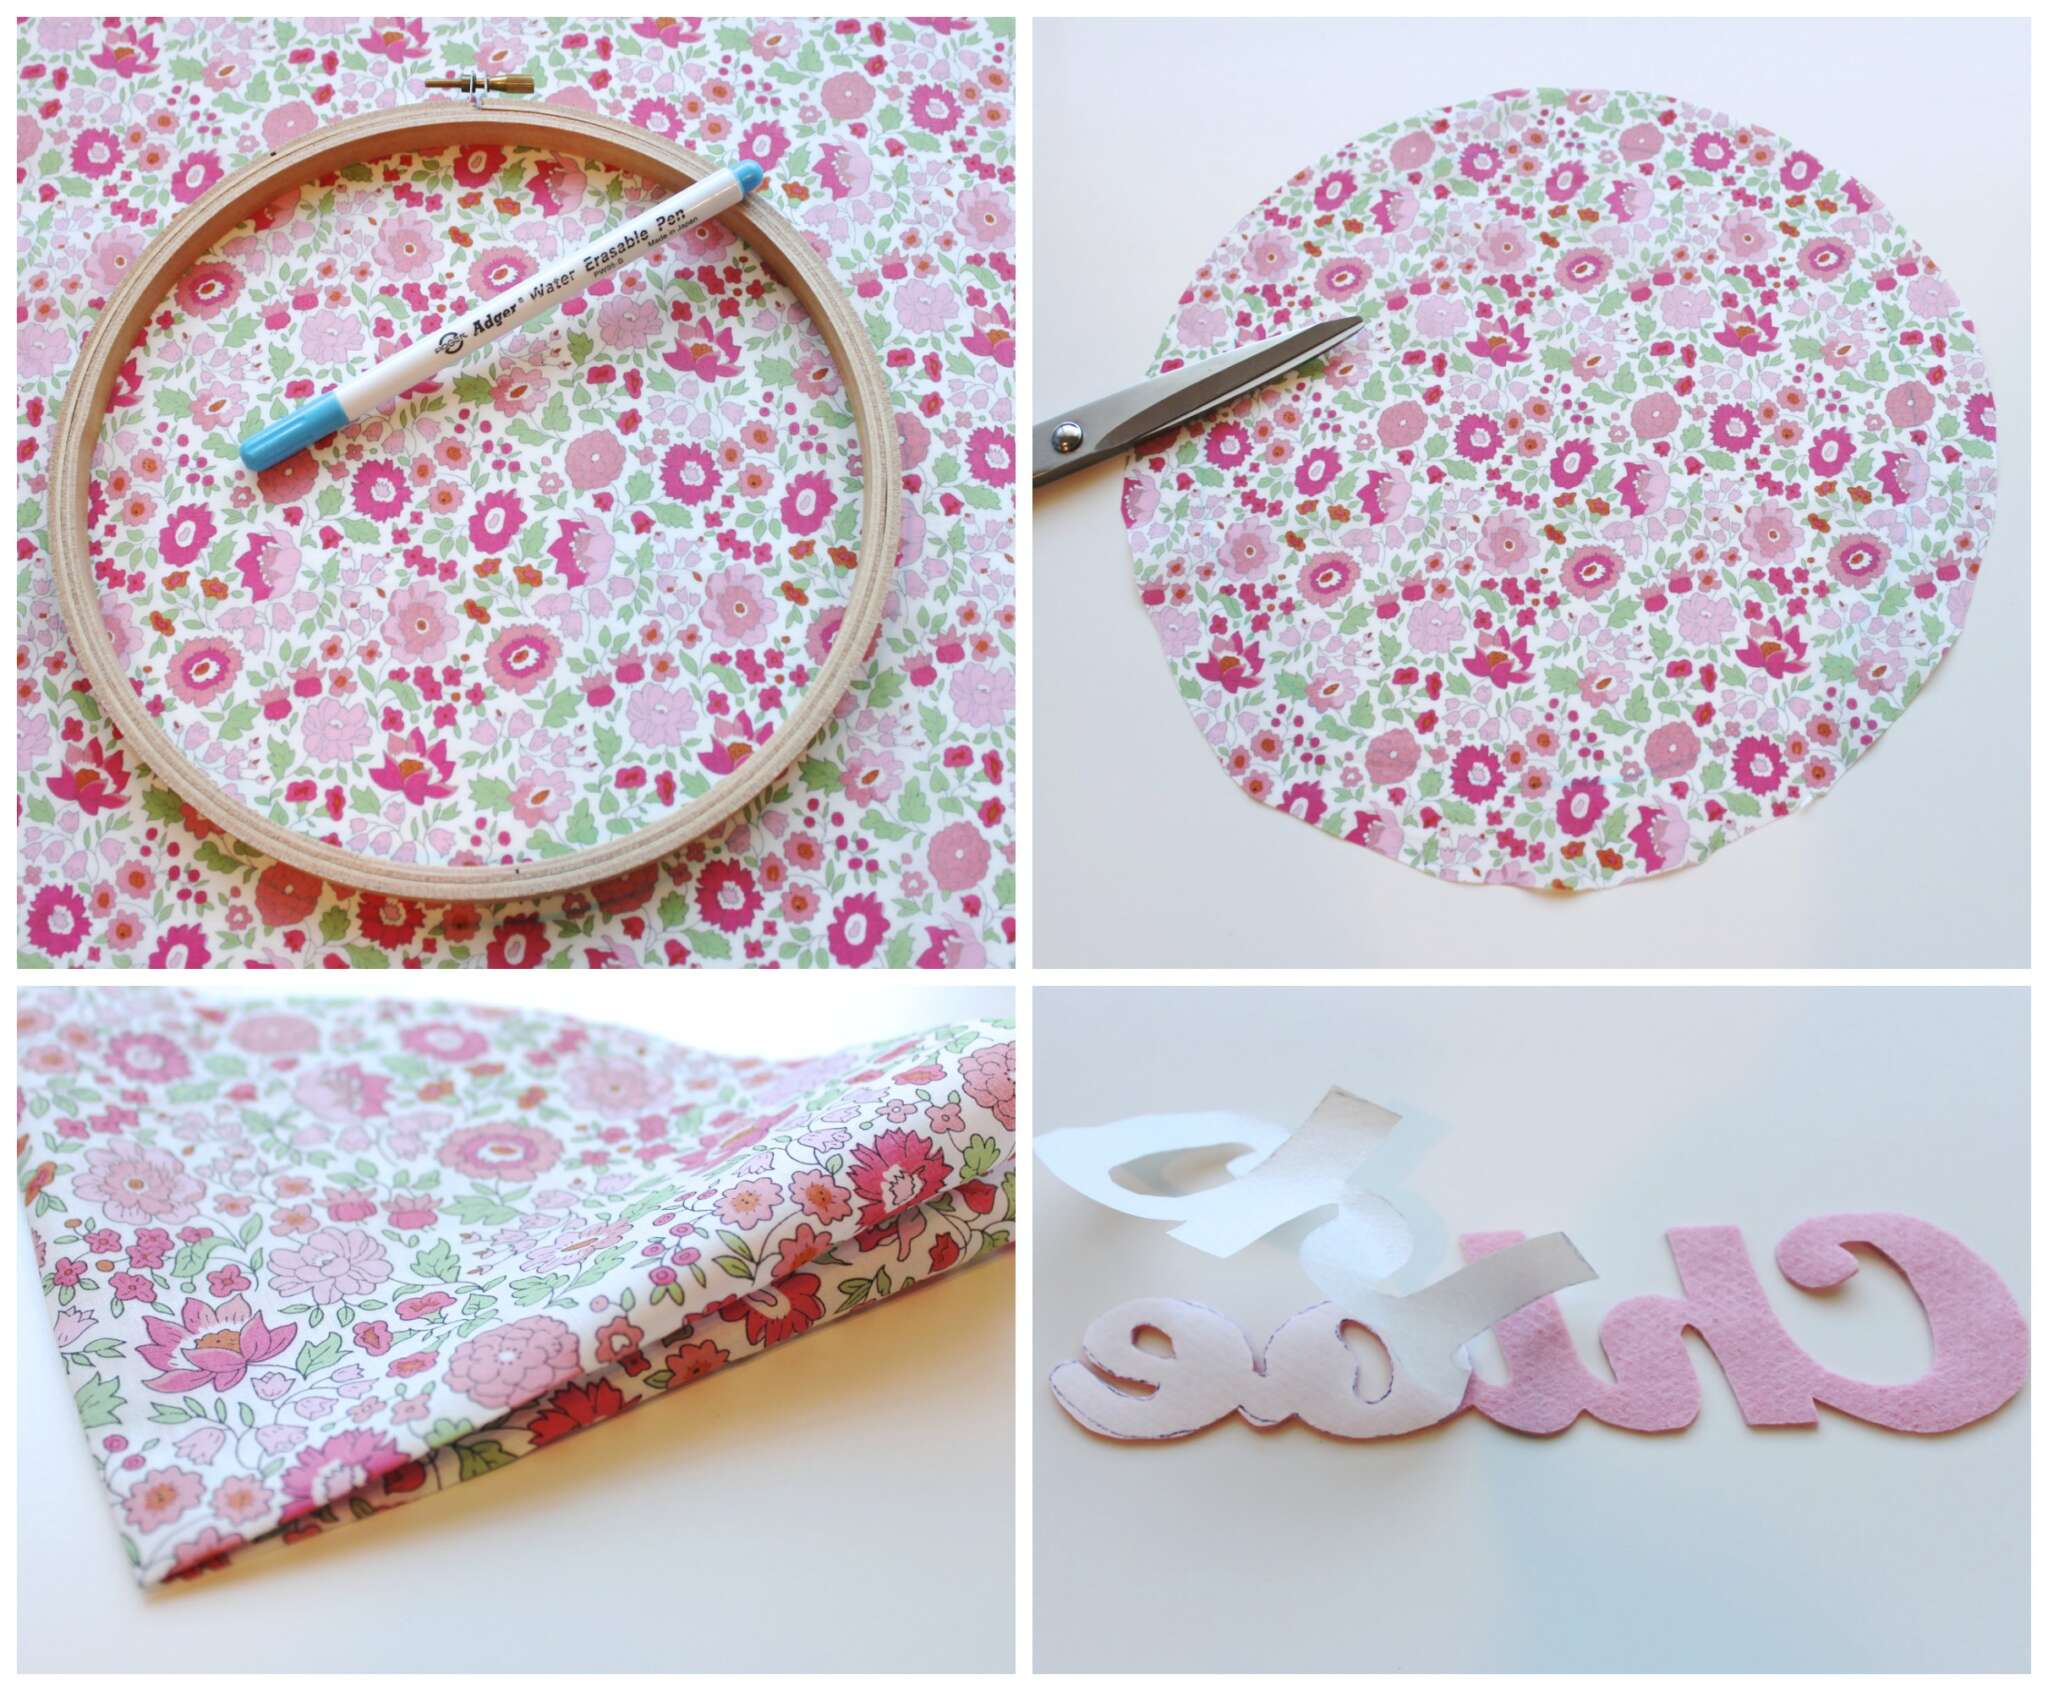
Centre your hoop on the back of your fabric square. Using your erasable marker pen, draw around the outside of the hoop.
Cut out a wider circle about an inch out from the circle you have just drawn.
Find the centre of your circle. I like to fold my fabric circle in half, then half again.
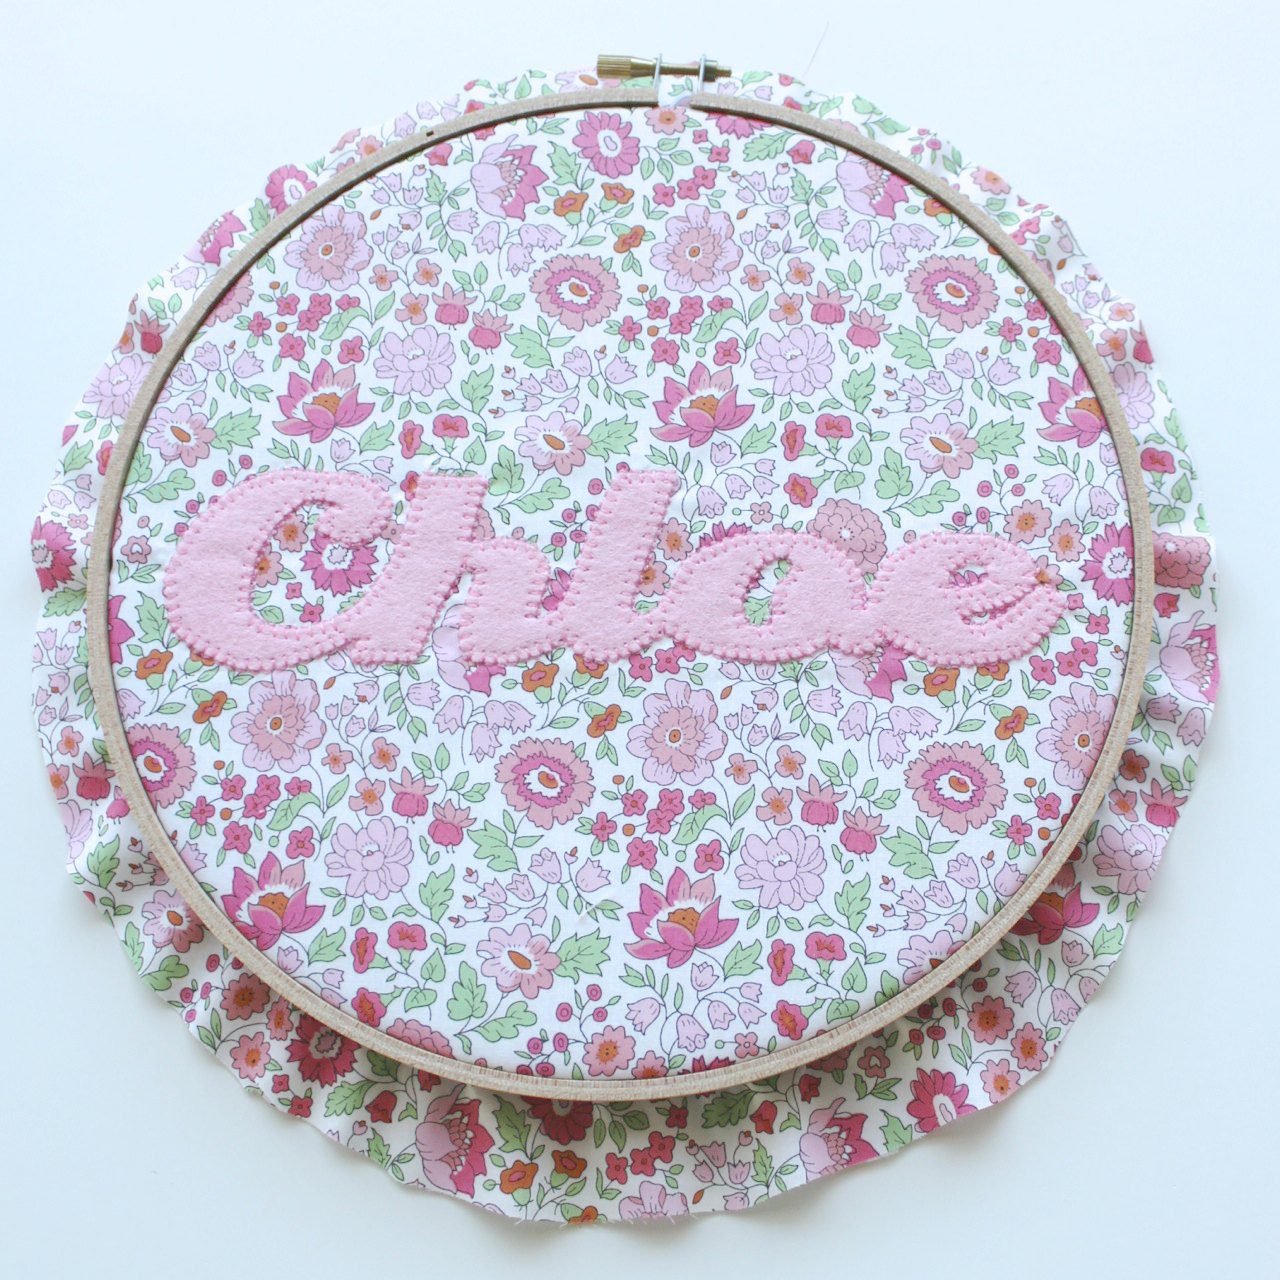
Peel the backing paper off the back of your felt name and position it in the centre of the right side of your fabric circle.
Cover your felt with a press cloth again and run a hot steam-free iron over the felt, to secure it to your fabric.
Now you’re ready to appliqué! For some great tips on appliquéing you can visit this POST. I like to use a blanket stitch for my appliqués. I feel it gives a really neat finish and it protects the raw edges of the felt or fabric. For this project, I’ve used the ‘blanket stitch’ setting on my sewing machine, using a clear plastic appliqué foot.
You can also blanket stitch by hand, or even do a simple running stitch. Truth be told, you don’t even have to stitch the appliqué down because the fusible webbing will keep it in place. But it does give it a lovely finish!
Start stitching in a join or bend on your word. I started on the base of the ‘e’. This helps to disguise your stitching when it joins.
Stitch slowly, carefully and close to the raw edge of the felt. Don’t forget to pivot your fabric (with the sewing machine needle down) when you come to a bend or corner. Be sure to carefully secure your stitching at the end.
When you’re finished, your stitching will look something like this;
 Now it’s time to pad up the fabric by adding some iron-on or fusible batting, like Pellon. I like to do this as it helps the fabric sit nicely in the hoop. I do it after the appliquéing step, so that the sewing machine doesn’t have too many layers to contend with.
Cut your Pellon batting in a circle that is just slightly smaller than your fabric. Lay the batting with the fusible dots down and facing the back of your appliquéd piece of fabric. Using a press cloth (as the batting will melt without it), use your hot non-steam iron to secure the batting. I had some scraps and actually used two pieces of Pellon. You can see how they meet on the back of the fabric here. I’m all for using scraps and saving cash!
Now it’s time to prepare the head band ribbons that will hang from the base of your hoop. Place your 1” wide ribbon over your 1.5” wide ribbon and centre it. Fold both layers over and stitch them together.
Using your erasable marker, measure 4 inches from the top of your ribbons and mark a small spot on the edge of your 1” ribbon. Continue down your ribbon, marking spots 4” apart. Fold back the top ribbon and now mark your 1.5” ribbon, except this time you are marking them 3’ apart. You can just see my markings in blue.
Starting at the top of your ribbons (where you stitched them together), line up your markings so that the top ribbon’s spot is directly over the bottom ribbon’s spot. Join both ribbons together by sewing a horizontal line across the width of the 1” ribbon. Be sure to use your reverse stitch on the machine to secure the beginning and end of your stitching.
Continue to line up your markings and stitch them down. You will find that the bottom ribbon will remain flat and the top ribbon will end up with loops in it.
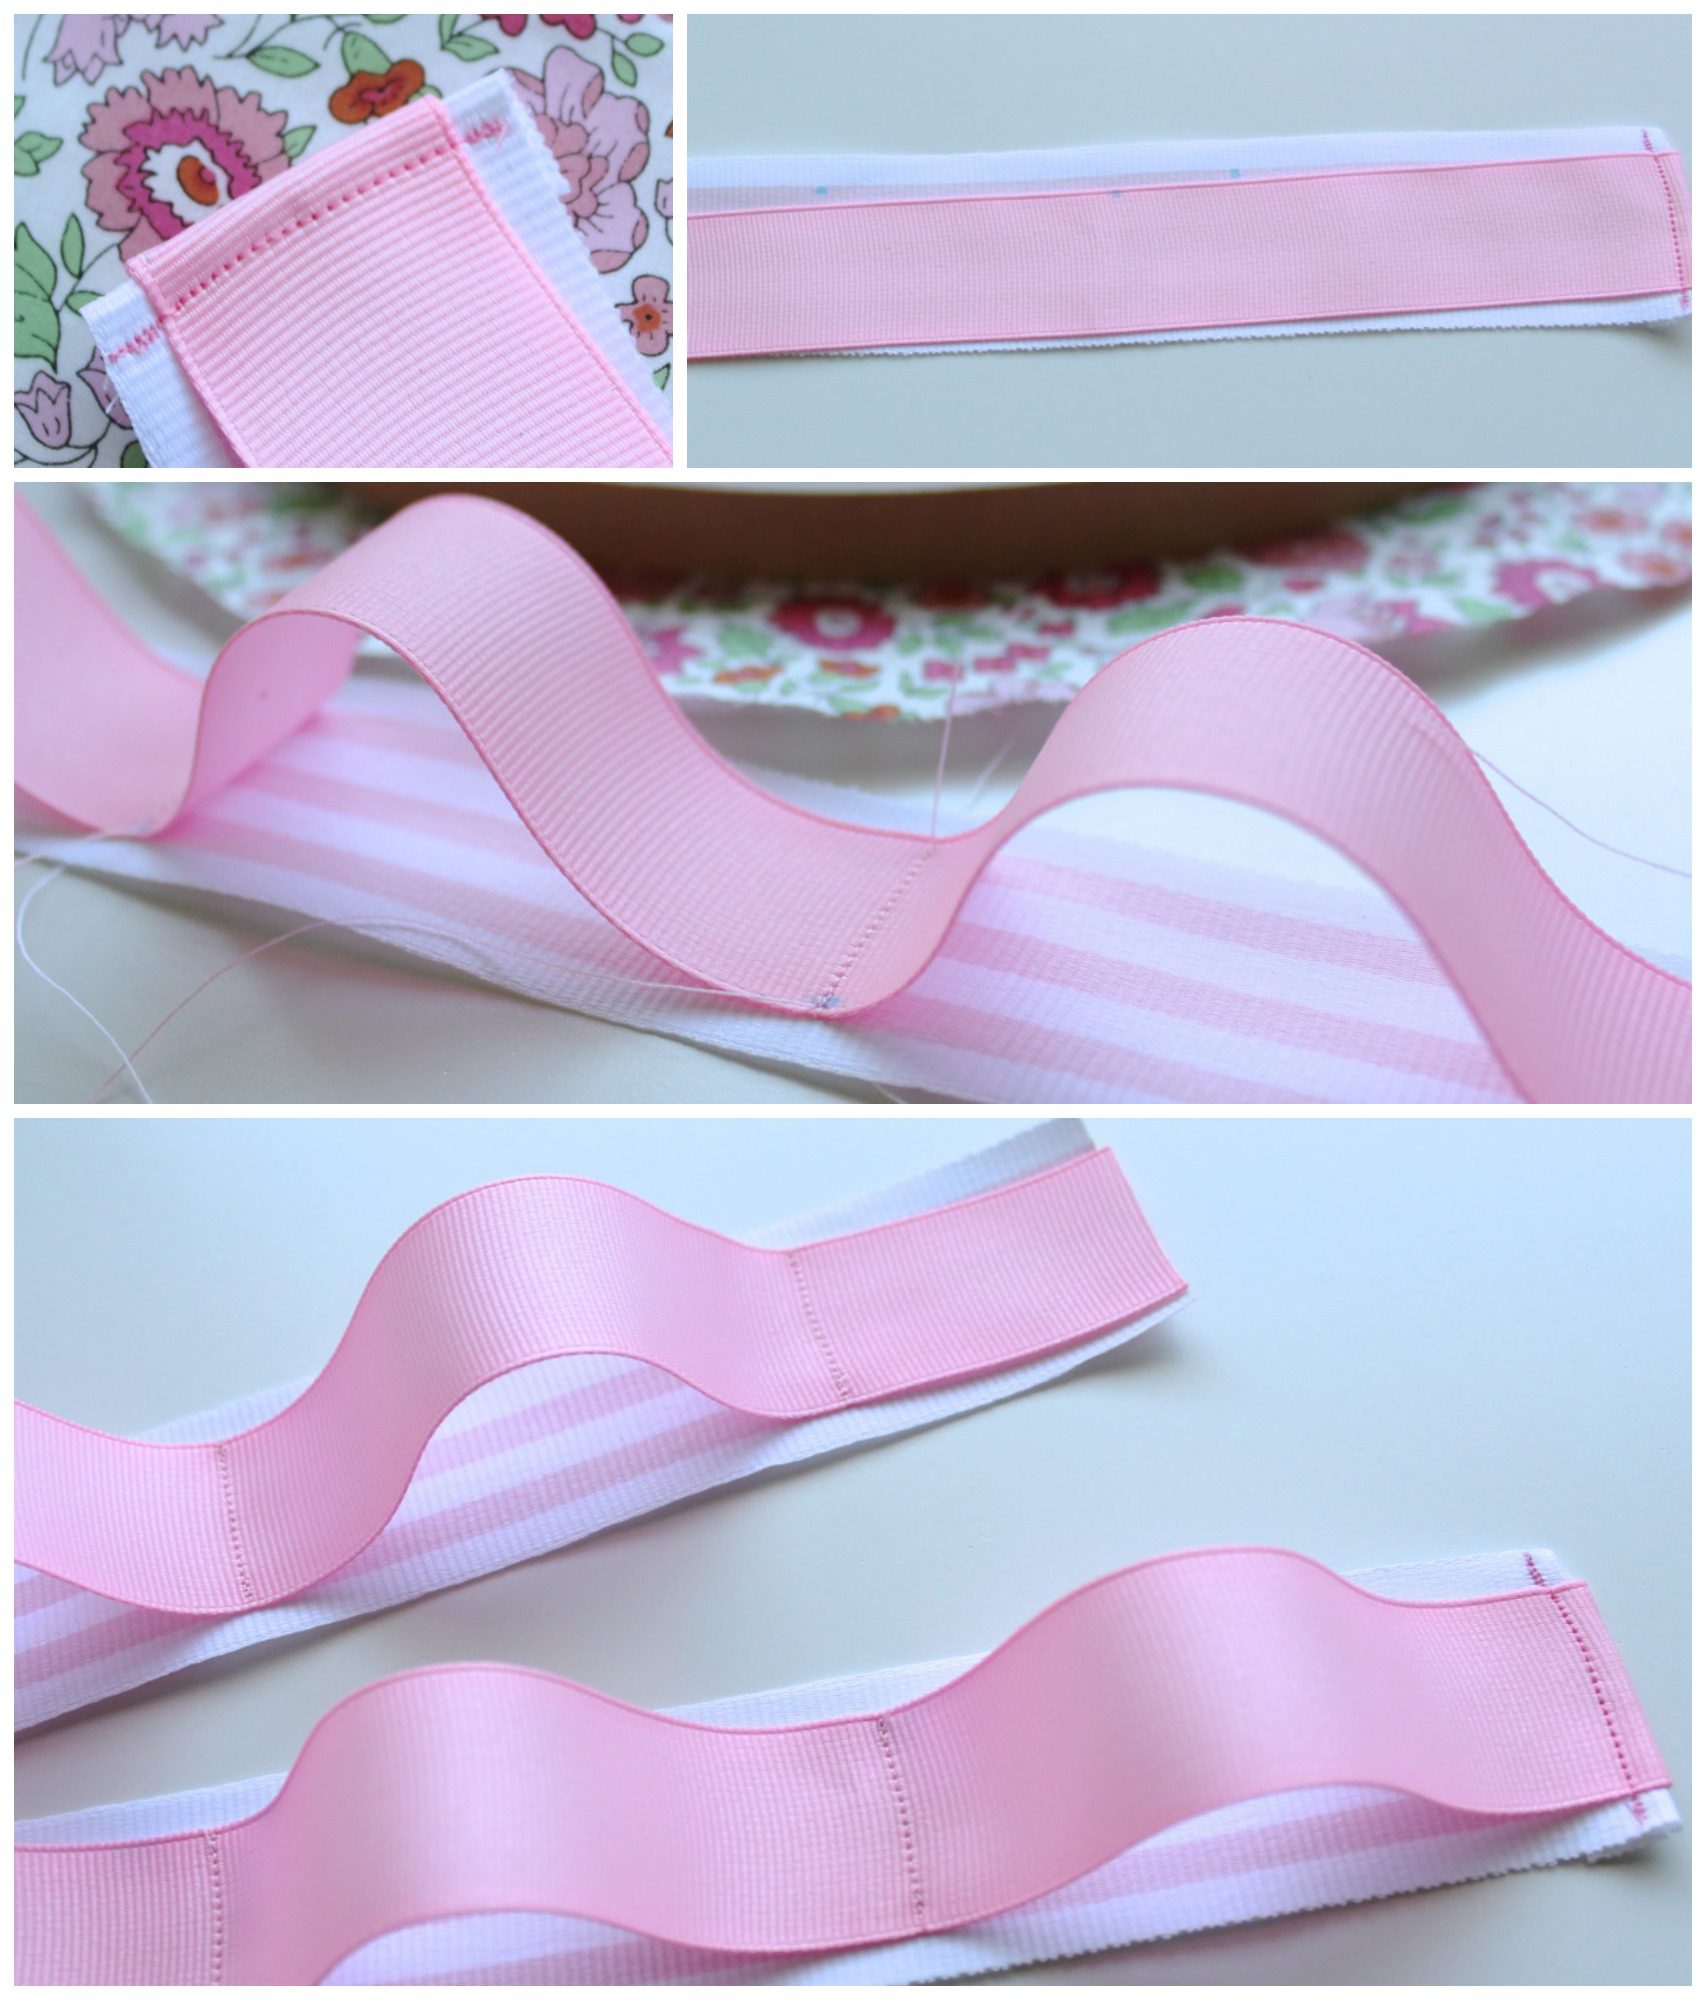
You’ll have nine loops in total. Once you’ve trimmed off your threads, also trim the base of the ribbons. Heat seal the ends so that they don’t fray. I have a machine I use, but a lighter or a lit match provides enough heat to do the same job. Just quickly run the flame along the open edge of the ribbon to melt the fibres together. You can see the trimmed loops and heat-sealed ends above. Don’t forget to dampen your erasable marker spots to remove them too.
Well it’s now time to put everything together! I hope you’re still following along and are able to use the images for some added guidance.
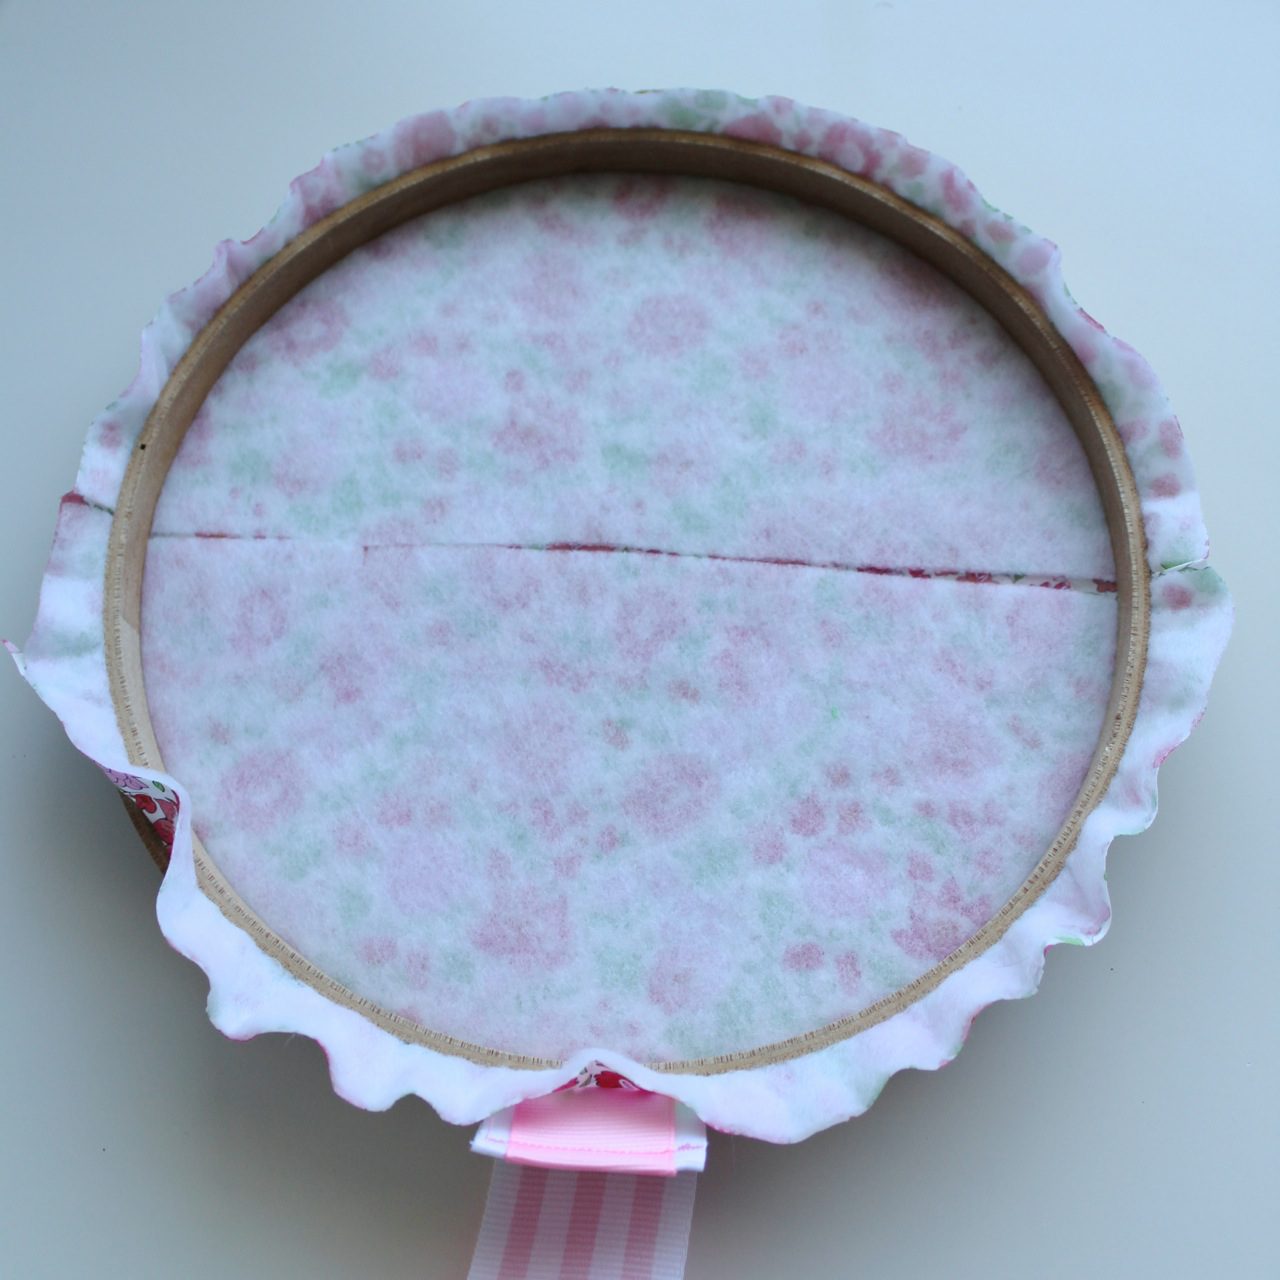
Unscrew your embroidery hoop and lay your fabric over the inside ring. Pop the outside ring over the fabric and tighten the screw just enough to gently hold everything in place. Make sure your appliquéd name is centred, and that the screw is centred on the top of the hoop.
Take the top of your ribbon (the part you stitched down) and feed it through the top side of the base of the hoop.
Tighten your screw as firmly (but gently) as you can. Then gently pull your fabric at the back so that there are no bubbles or puckers on the front of your hoop. You want your fabric sitting taut and smooth.
Flip your hoop over and fold your extra allowance down inside the hoop.
If it’s a tad long, trim away some of the excess (ensuring you still have enough fabric to tuck in).
Now we’re ready to secure everything, so be sure you’re happy with how everything appears at the front of the hoop and make some adjustments if necessary. Your screw should be centred at the top, your name should be centred and straight, and your ribbon should be centred at the bottom.
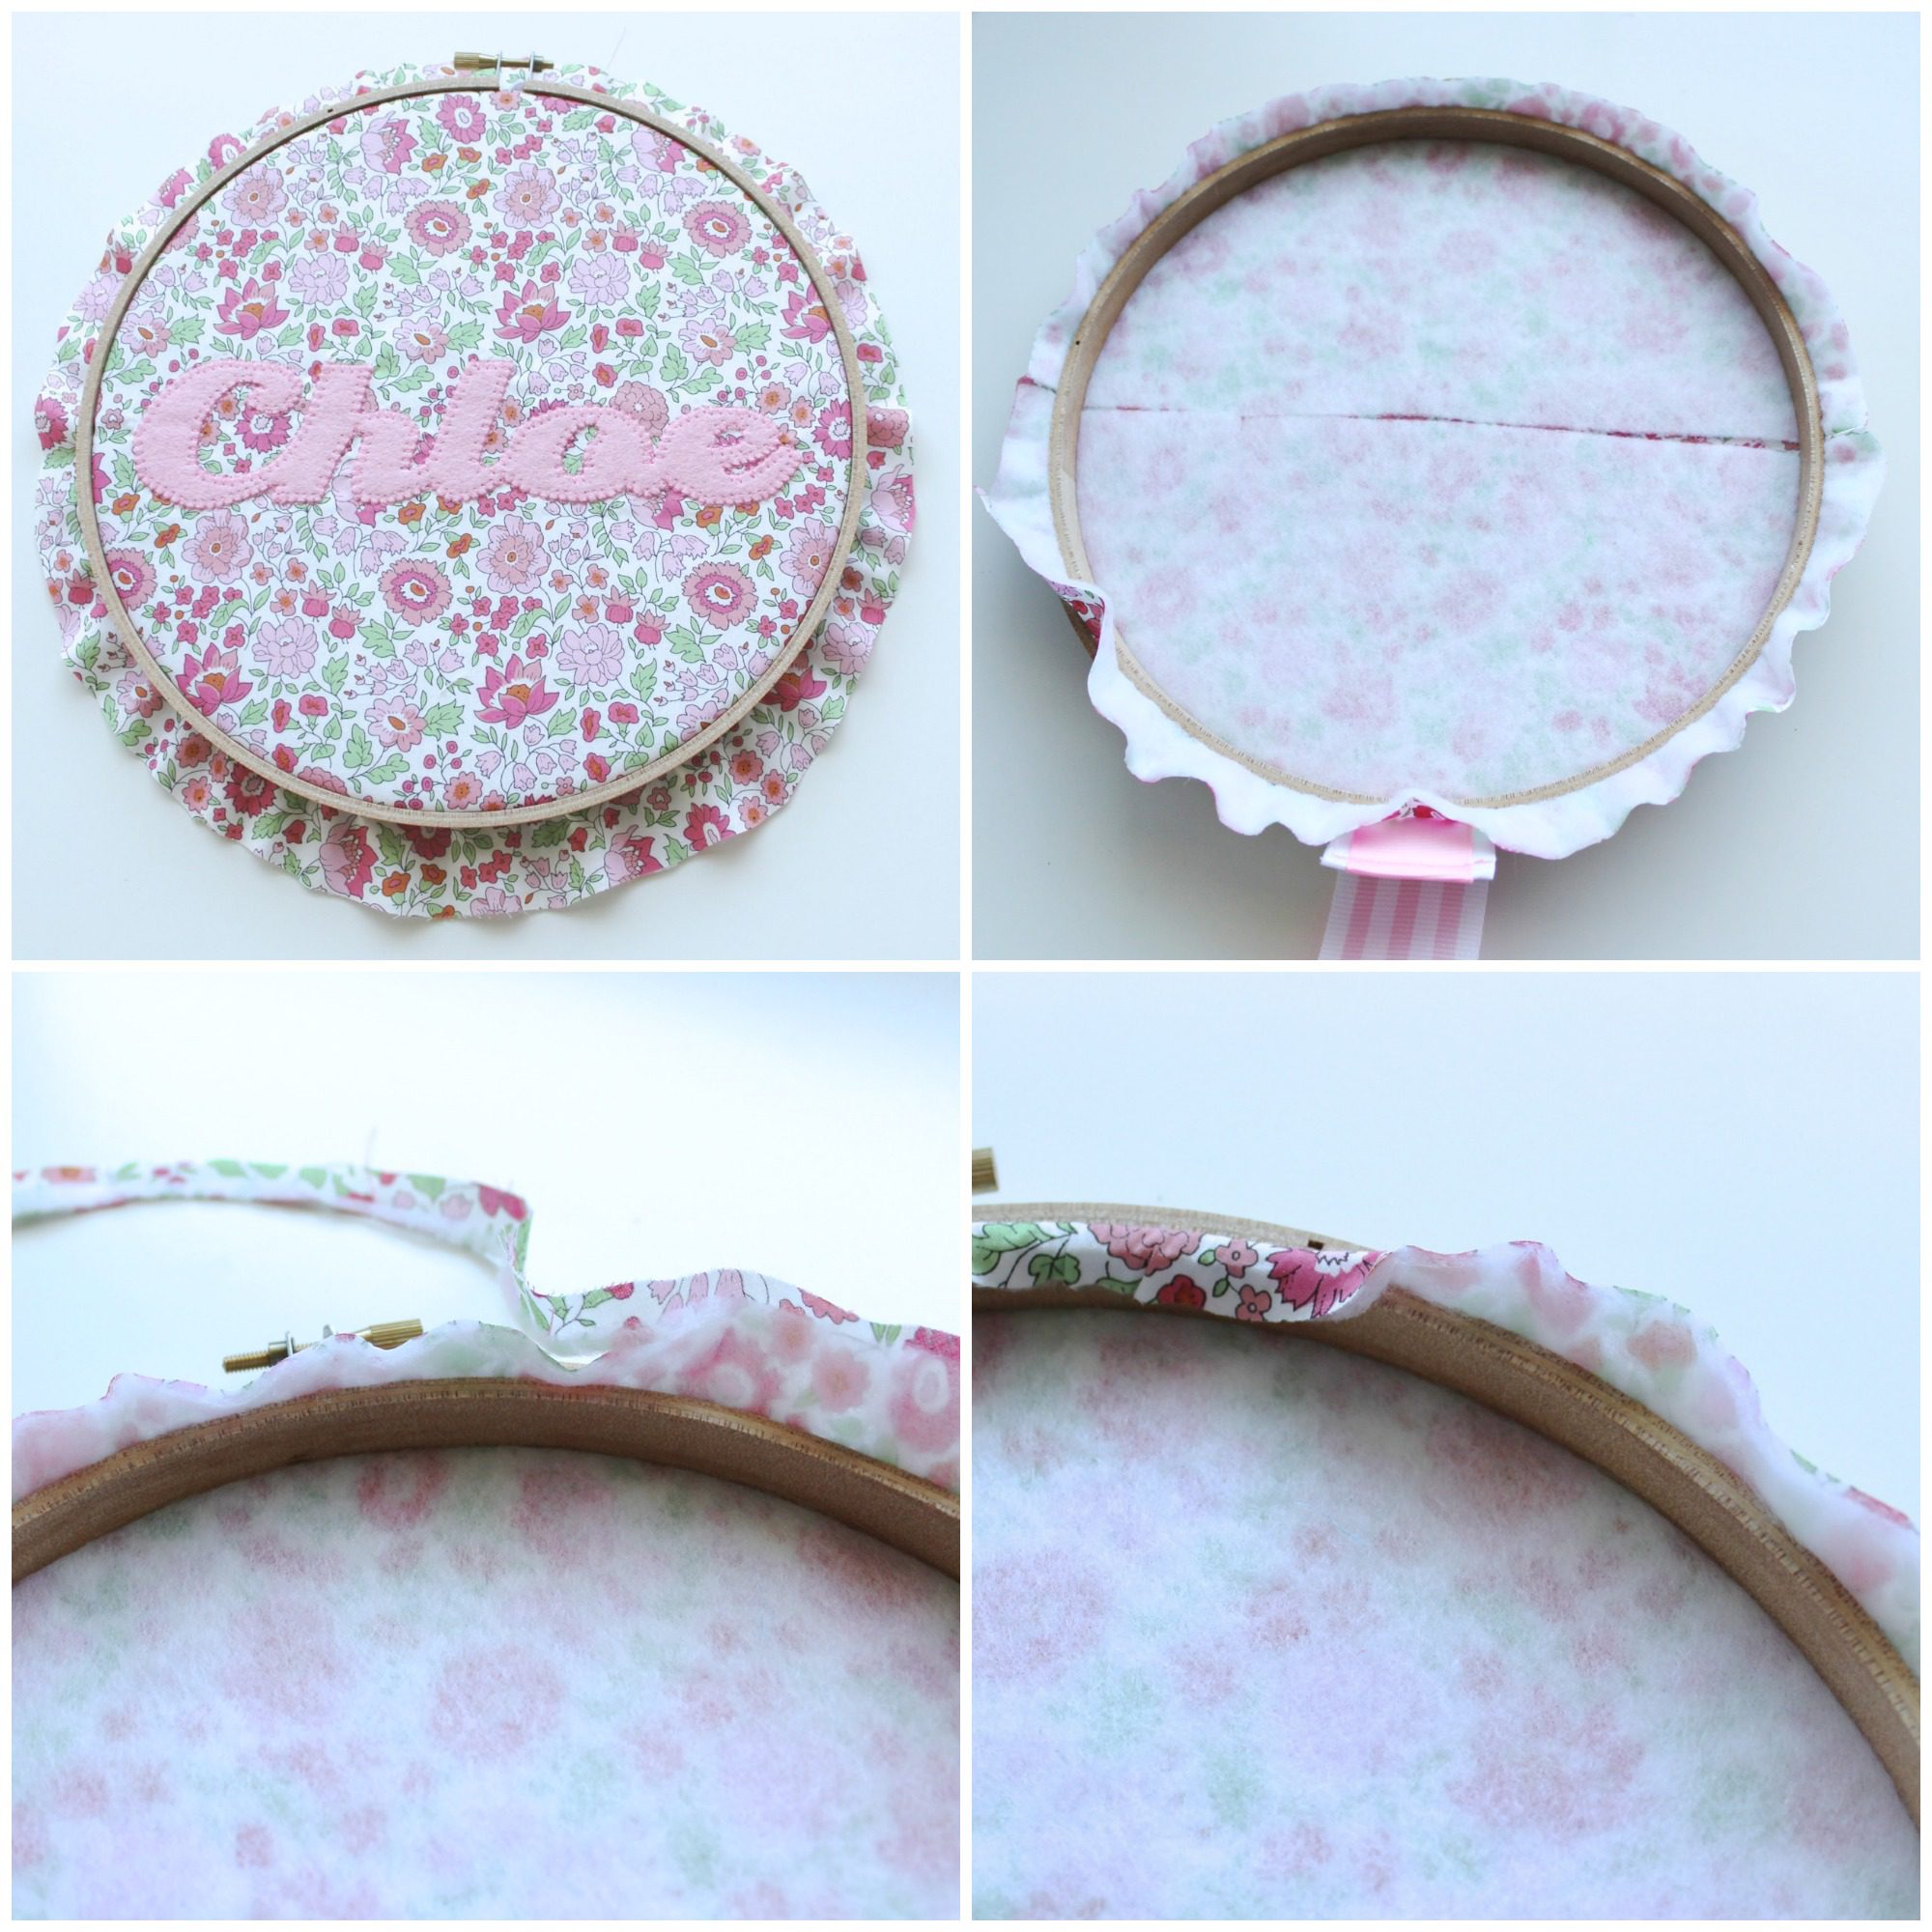
Heat your hot glue gun, and run a line of hot glue along the inside of the wooden rim. Tuck your fabric over and use the glue to secure it down. Only cover a couple of inches at a time, lest your hot glue set before you get to it! When you’ve finished, your hoop should sit flush against a flat surface.
There are many other ways to finish the back of an embroidery hoop. You can cover the inside ring with a circle of cardboard, or circle of felt. But for the sake of simplicity, I have left it plain but neat.
We’re just about done. We just need to pretty it up! Tie a bow with some ribbon and trim the ends. Be sure to heat seal the ends too. Glue your bow to the top front of your hoop, and you’re done!
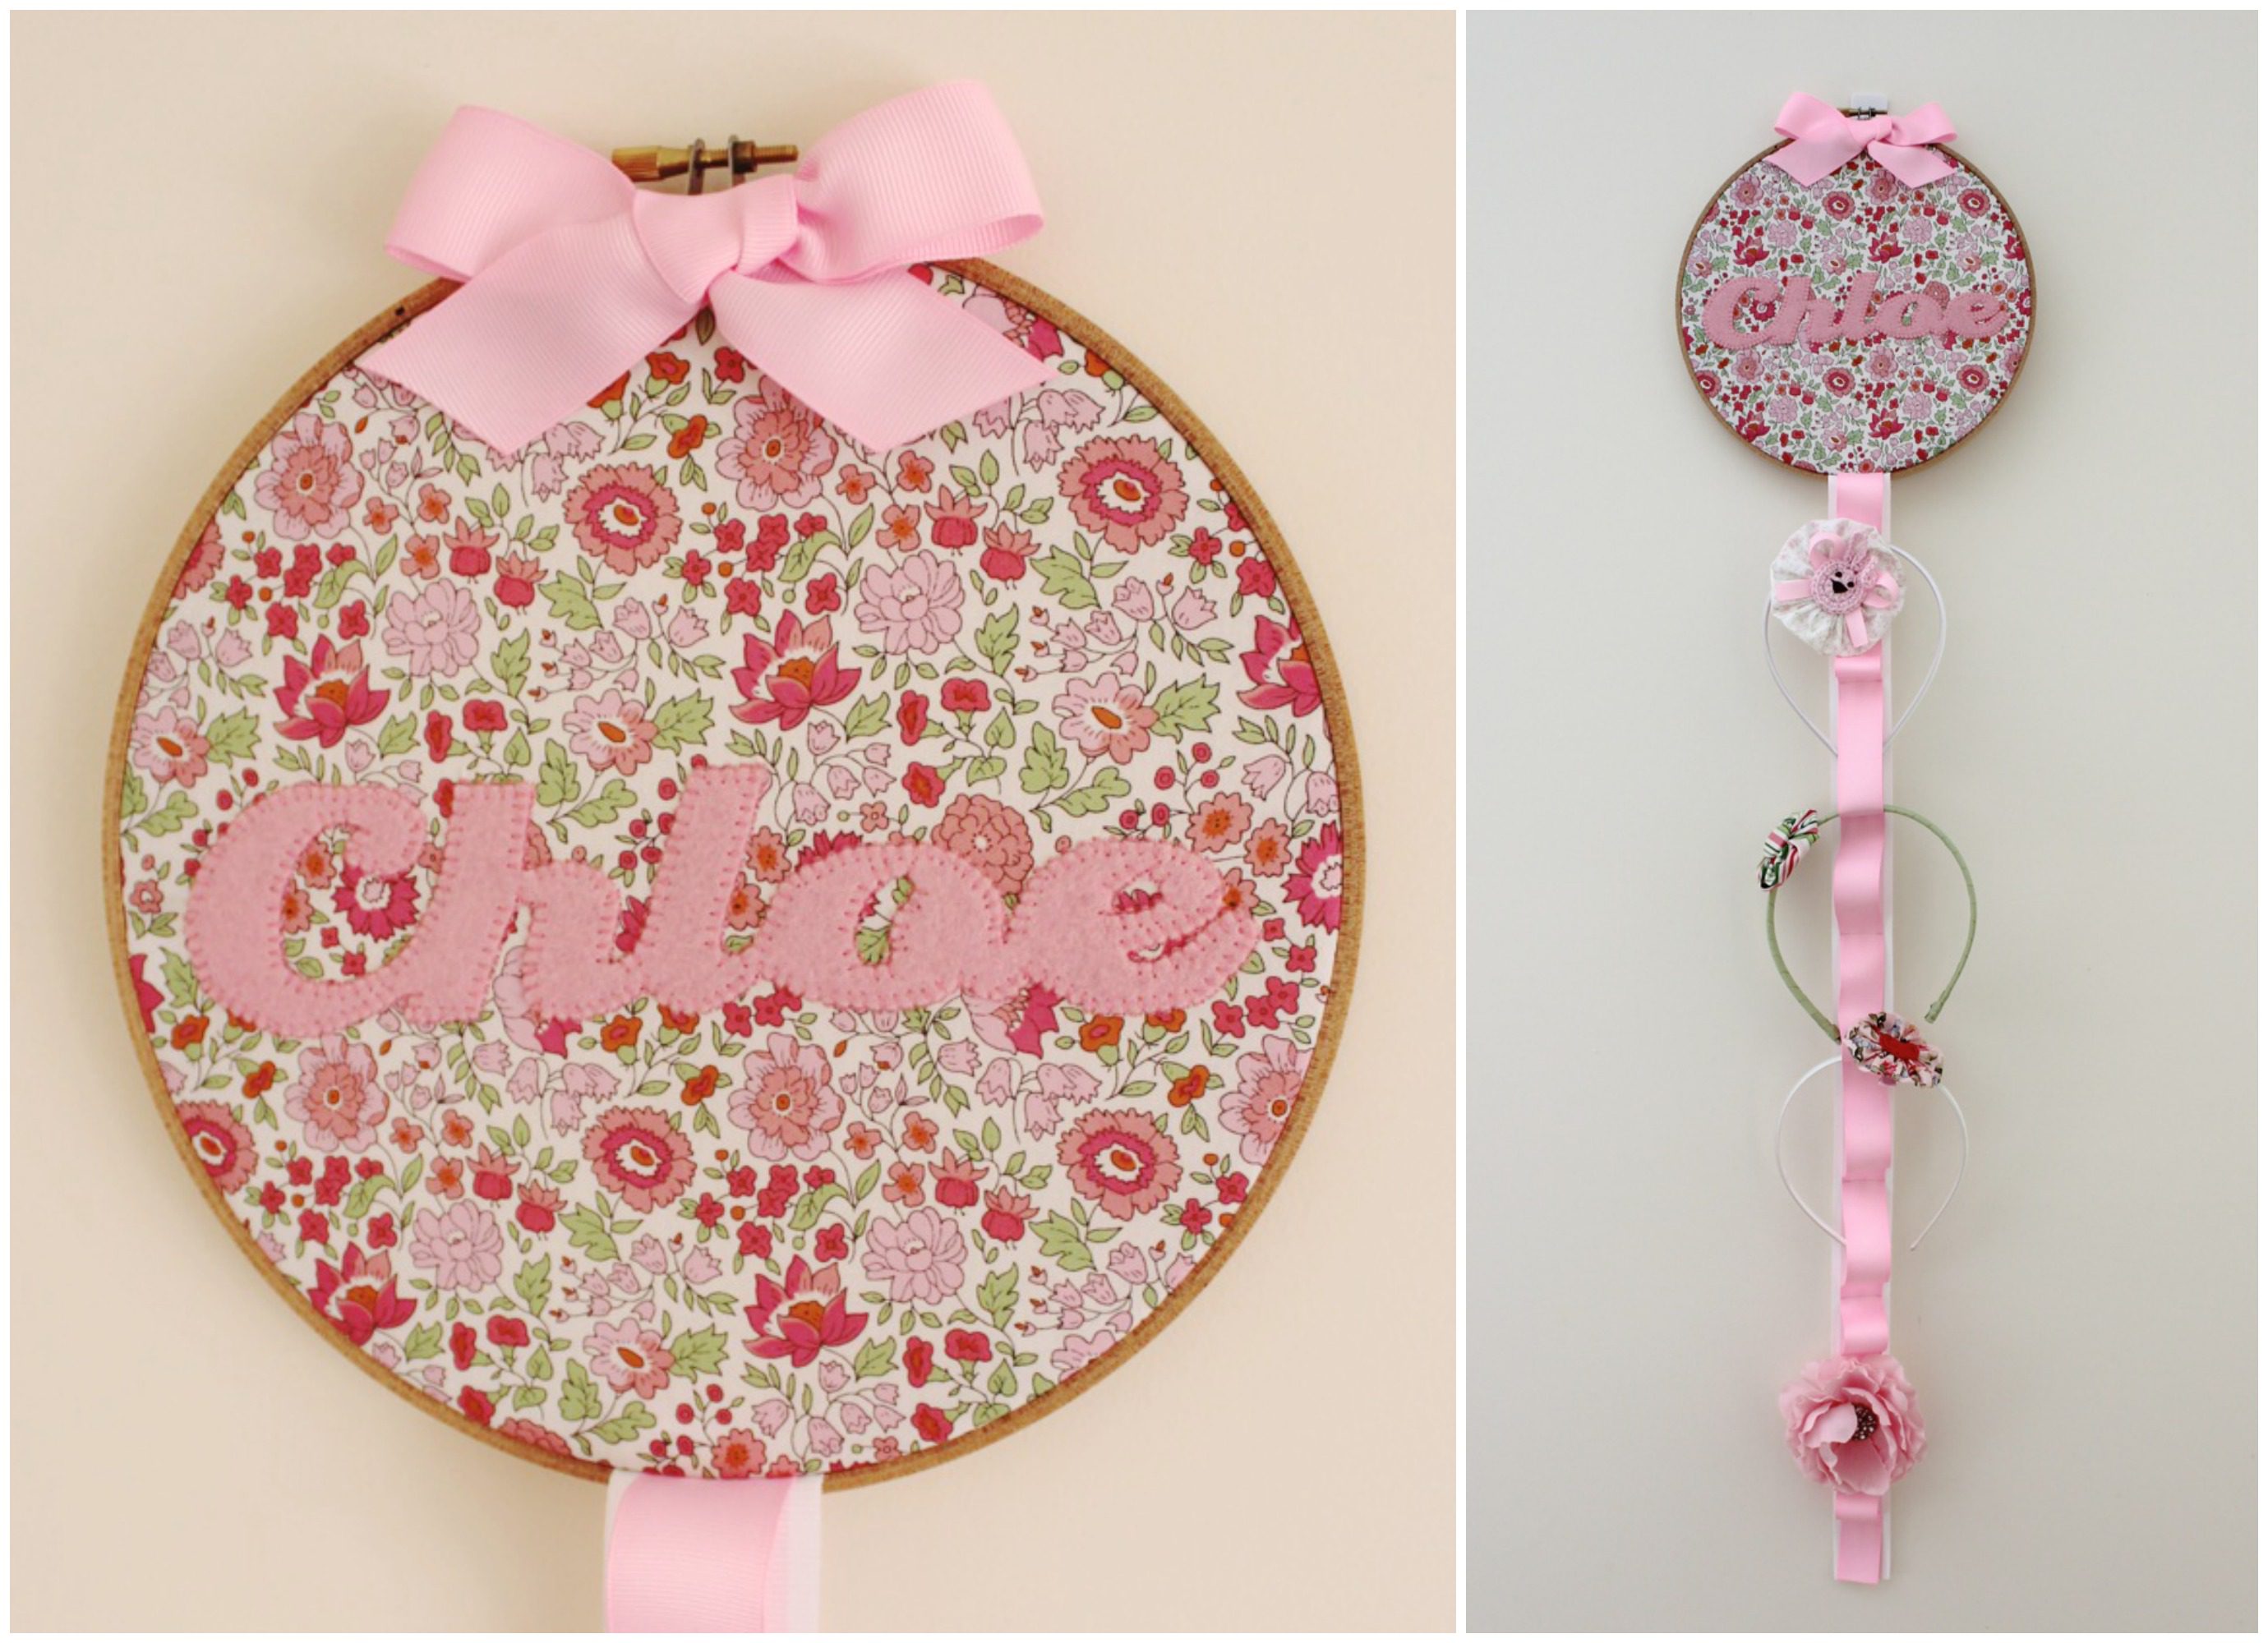
Such a simple project! You can feed head bands through the loops and you can also attach clips too. If you’d like to have a go at making your own hair clips, you can read the tutorial for basic clips HERE and for yo-yo clips HERE.
This is such a pretty addition to any girl’s bedroom! I have lots more inspiration for little girl’s bedrooms on this Pinterest Board too.
Thanks for stopping by for another Molly and Mama tutorial! Feel free to share your projects on our Facebook Page.
Happy creating, Lauren x
This post was written by Lauren Wright of Molly and Mama http://www.MollyandMama.com.au

This is absolutely gorgeous!!!! So need one for Emma!
>
Thanks Amanda! I’d love you to have a go at this! Or let me know if she still needs one next birthday 😉